Saturday, December 12, 2009
RAVI COMPUTER EDUCATION CENTRE
RAVI COMPUTER EDUCATION CENTRE: "It is a blog for computer education who people cannot pay heavy fees to the computer centres. Who has not time to go anywhere for computer course and w..."
Friday, December 11, 2009
MICROSOFT WORD 2000
How to Start MS-Word
 We will start with the Title bar, which is located at the very top of the screen. On the Title bar, Microsoft Word displays the name of the document you are currently using. At the top of your screen, you should see "Microsoft Word - Document1" or a similar name.
 The Menu bar is directly below the Title bar and it displays the menu. The menu begins with the word File and continues with Edit, View, Insert, Format, Tools, Table, Window, and Help. You use the menu to give instructions to the software
These are Toolbars
 STANDARD TOOLBAR
 FORMATTING TOOLBAR
RULER BAR

The ruler is generally found below the main toolbars. The ruler is used to change the format of your document quickly. To display the ruler: click on View Menu - Click on Ruler
TEXT AREA

Click on Start Menu - after that Programs - Microsoft Word
After that MS--Word will be open and window will be display like this:-
After that MS--Word will be open and window will be display like this:-
 Title Bar
We will start with the Title bar, which is located at the very top of the screen. On the Title bar, Microsoft Word displays the name of the document you are currently using. At the top of your screen, you should see "Microsoft Word - Document1" or a similar name.MENU BAR
The Menu bar is directly below the Title bar and it displays the menu. The menu begins with the word File and continues with Edit, View, Insert, Format, Tools, Table, Window, and Help. You use the menu to give instructions to the softwareThese are Toolbars
STANDARD TOOLBAR FORMATTING TOOLBARToolbars provide shortcuts to menu commands. Toolbars are generally located just below the Menu bar. sometimes these toolbars are hide in some computer. To show this toolbars Click on View Menu - click toolbars - click standard option & formatting option.
RULER BAR
The ruler is generally found below the main toolbars. The ruler is used to change the format of your document quickly. To display the ruler: click on View Menu - Click on Ruler
TEXT AREA
Just below the ruler is a large area called the "text area." You type your document in the text area. The blinking vertical line in the upper left corner of the text area is the cursor. It marks the insertion point. As you type, your work will show at the cursor location. The horizontal line next to the cursor marks the end of the document.
HORIZONTAL AND VERTICAL TOOLBAR

By this toolbar we can move up, down, left and right to our page.
NOW WE START HOW TO USE MICROSOFT WORD
FILE MENU
How to Open
Start – Program – Microsoft Word
New:- Create new file
Method :- File-new-ok
Open (File menu)
Opens or finds a file.
Method;- File – Open – select file – open
Save :- Save to File
Method:- File – save – give name – save
Save as :- Save to file with different name.
Method:- File – save as – give name – save
Save As Web Page (File menu)
Save as Web Page:- Saves the file in HTML format (a Web page), so that it can be viewed in a Web browser.
Method:- File – save as web page – give name – save
Web Page Preview
Allows you to preview the current file as a Web page in your browser so that you can see how it will look before publishing it.
Method:-File – web page preview
Page Setup (File menu)
Sets margins, paper source, paper size, page orientation, and other layout options for the active file.
To set margins
Method:- File – page setup – set margin – ok
To set paper size
Method:- File – page setup – paper size – selection paper size – ok
To set the orientation
Mean if your to take printout in Vertical position then we selection portrait and landscape means horizontal positon.
Method:- File – page setup – Paper size - click portrait or landscape – ok
Print Preview (File menu)
Shows how a file will look when you print it.
Method:- File – Print Preview
Then come out from print preview click Close button
Print (File menu)
Prints the active file or selected items.
Method:- File – Print – Select range – ok
All – All pages
Pages :- In Pages box you type page range like if you want to print from 1st page to 4th page you type 1-4 and you want to print 1st or 4th page you type 1,4 – ok
Current page – Where has you curser – ok
Properties (File menu)
Displays the property sheet for the active file. Like file location, size etc.
Method:- File – properties – general – ok
EDIT MENU
Undo (Edit menu)
Reverses the last command or deletes the last entry you typed. for example suppose we are typing something and accidently it delete then at that time we will click on Edit menu and Undo option
Method:- Edit – Undo
Repeat (Edit menu)
Repeats your last command or action,
Method:- Edit – Redo
Cut (Edit menu)
Removes the selection from the active document and places it on the Clipboard.
Method:- Select matter – Edit – Cut
Bring Curser on that location where you want to move this matter.
Edit – Paste
HOW TO SELECT OR HIGHLIGHT A MATTER.
1. Place the cursor before or after the text you wish to highlight.
2. Hold down the left mouse button.
3. Move the mouse left, right, up, or down until the text is highlighted.
By Shift Key or Arrow Keys we can select our matter through keyboard.
Copy (Edit Menu)
Copies the selection to the Clipboard.
Method:- Select matter – edit – copy
Bring Curser on that location where you want to paste this matter.
Edit – paste
Paste Special (Edit menu)
Pastes Formatted text into simple text only.
Method:- Format to matter – copy matter click edit – paste special – select unformatted text – ok
Clear (Edit menu)
Deletes the selected object or text without putting it on the Clipboard. This command is available only if an object or text is selected.
Method:- Select text – edit – clear
Select All (Edit Menu)
Select everything.
Method:- Edit – select all
Find (Edit Menu)
To find any particular word.
Method:- Edit – find – type word – find next
Replace (Edit Menu)
Searches for and replaces the specified text and formatting.
Method:- Find word – edit – replace – type replace word in replace box – replace
Go To (Edit menu)
In Microsoft Word, moves the insertion point to the item you want to go to. You can move to a page number, comment, footnote, bookmark, or other location.
Method:- Edit – go to – select page or line – give line or page no – go to
VIEW MENU
Normal (View menu)
Switches to normal view, which is the default document view for most word-processing tasks, such as typing, editing, and formatting.
Method:- View – normal
Web Layout
Switches the active document to Web layout view, which is an editing view that displays your document as it will appear in a Web browser.
Method:- View – Web layout
Print Layout
Switches the active document to print layout view, which is an editing view that displays your document as it will print. Print layout view uses more system memory, so scrolling may be slower, especially if your document contains many pictures or complex formatting.
Method:- View – Print layout
Toolbars (View menu)
Displays or hides toolbars. To display a toolbar, select the check box next to the toolbar name. To hide a toolbar, clear the check box.
Method:- View – Toolbars
Ruler (View menu)
Displays or hides the horizontal ruler, which you can use to position objects, change paragraph indents, page margins, and other spacing settings.
Method:- View - Ruler
Document Map (View menu)
Turns on or off the Document Map, a vertical pane along the left edge of the document window that outlines the document structure. Use the Document Map to quickly browse a long or online document and to keep track of your location in it.
Method:- Make heading by format bar and click on View – Document Map
Header and Footer (View menu)
Adds or changes the text that appears at the top and bottom of every page or slide.
Method:- View – Header and Footer – type header – click switch between header and footer – type footer – close
Full Screen (View menu)
Hides most screen elements so that you can view more of your document. To switch back to your previous view, click or press ESC.
View – Full screen
Zoom (View menu)
Controls how large or small the current file appears on the screen.
Method:- View – Zoom – Select percentage – ok
INSERT MENU
Break (Insert menu)
Inserts a page break, column break, or section break at the insertion point.
Method:- Insert menu – break – ok
Page Numbers (Header and Footer toolbar)
Inserts page numbers that automatically update when you add or delete pages.
Method:- Insert menu – page number – select position – selection alignment – ok
Date and Time (Insert menu)
Adds the date and time to an individual slide using the format you choose. If you want to add the date and time to every slide, use the Header and Footer command (View menu).
Method:- Insert menu – date and time – select date and time – ok
AutoText
Creates or inserts an AutoText entry.
Method:- select matter - Insert menu – auto text – new – give name – ok after that type name which you give in auto text box and press space bar or enter.
Symbol (Insert menu)
Inserts symbols and special characters from the fonts that are installed on your computer.
Method:- insert menu – symbol – select symbol – ok
Comment
Inserts a comment at the insertion point.
Method:- insert menu – comment – type comment – close
Footnote
To type footnote for any word.
Method:- insert menu – footenote – ok – type footnote
Caption (Insert menu)
Inserts captions for tables, figures, equations, and other items.
Method:- insert picture – insert menu- caption – ok
Cross-reference (Insert menu)
Inserts a cross-reference to an item in a document.
Method:- type some headings on every page or numbering item – insert menu – cross-reference – select heading or numbering item in reference type box – select heading or numbering item – insert.
Index & Table
Make index and table in the document.
Method:- Make heading on every page – go last or first page – insert menu – index & table – table of contents – ok
Picture (Insert menu)
Clip Art
Opens the Clip Gallery where you can select the clip art image you want to insert in your file or update your clip art collection. In PowerPoint, this command is available only in slide and notes views.
Method:- insert menu – picture – clip art – select picture – insert clip
Picture
From File (Insert menu)
Inserts an existing picture in the active file at the insertion point.
Method:- Insert menu – picture – from file – select file – insert
AutoShapes Menu
Displays the AutoShape categories you can insert. Click an AutoShape category, click the AutoShape you want, and then click or drag in the active window where you want to insert the AutoShape. To draw an AutoShape that retains its default height-to-width ratio, hold down SHIFT while you drag.
Method:- insert menu – picture – auto shapes
Insert WordArt
Creates text effects by inserting a Microsoft Office drawing object.
Method:- insert menu – picture – word art – selection you writing style - type text – ok
Chart
Creates a chart by inserting a Microsoft Graph object.
Method:- insert menu – picture – chart – fill value – click outside
Text Box
Create text box
Method:- insert menu – text box – make box – do type matter.
File (Insert menu)
Inserts all or part of the file you select, into the active file at the insertion point.
Method:- Insert menu – file – select file – insert
Object (Insert menu)
Inserts an object ¾ such as a drawing, WordArt text effect, or an equation ¾ at the insertion point.
Method:- Insert menu – object – select paintbrush picture program – ok – make picture – click outside
Bookmark (Insert menu)
Creates bookmarks, which you can use to mark selected text, graphics, tables, or other items.
Method:- select matter – insert menu - bookmark – give name – add
To see bookmark :- insert menu – select name – go to
Hyperlink
Inserts a new hyperlink of file or edits the selected hyperlink.
Method:- insert menu – hyperlink – file – select file – ok – ok
FORMAT MENU
Font (Format menu)
Changes the font, font style, font size, font colour, underline style, underline colour, character spacing and text effect formats of the selected text.
Method:- select matter – font – select font, font style, font size, font colour, underline style, underline colour, effect – ok
For character spacing – select matter – format – font – character spacing – select spacing condensed or expanded (in spacing box) – ok
For Text Animation :- select matter – format – font – text effect – select animations – ok
Paragraph (Format menu)
Changes paragraph indents, text alignment, line spacing, pagination, and other paragraph formats in the selected paragraph.
Method:- select matter – format menu – paragraph – select first line option (in special box) – ok
For line spacing :- select matter – format menu – paragraph – select line spacing (in spacing box) – ok
Bullets and Numbering (Format menu)
Adds bullets or numbers to selected paragraphs and modifies the bullets and numbering format.
Method:- for bullets- select matter – format – bullet and numbering – select bullet – ok
For number format – select matter – format – bullet and numbering – numbered – select numbering – ok
Border And Shading (Format menu)
Adds borders and shading to selected text, paragraphs, pages, table cells, or pictures.
To make border of selected text.
Method:- Select matter – format – border & shading – selection border – ok
To make page border.
Method:- format – border & shading – page border – select art in art box – ok
To shading of selected text.
Method:- select matter – format – border & shading – shading – select colour – selection pattern – ok
Columns (Format menu)
Changes the number of columns in a document or a section of a document.
Method:- Select matter – format – column – select columns – ok
Tabs (Format menu)
Sets the position and alignment of tab stops and determines the type of leader character for each tab stop.
Method:- format – tabs – give position like 2.6 – add – give position 3 – add – ok
Drop Cap (Format menu)
Formats a letter, word, or selected text with a large initial ¾ or "dropped" ¾ capital letter. A "drop cap" is traditionally the first letter in a paragraph, and it can appear either in the left margin or dropped from the base line of the first line in the paragraph.
Method:- select matter – format – drop cap – select cap – ok
Change Case (Format menu)
Changes the capitalization of selected text. Convert text into Upper case, lower case, senetences, toggle case, title case etc
Method :- select matter – format – change case – select case – ok
Background (Format menu)
Change background colour
Method:- format – background – click on colour
Web Theme (Format menu)
Applies a new or different theme, or removes a theme in a Web page, document, e-mail message, or data access page. A theme is a set of unified design elements and color schemes for background images, bullets, fonts, horizontal lines, and other document elements.
Method:- format – theme – select theme – ok
AutoFormat (Format menu)
Analyzes the content of the active file and then automatically formats the file. If you want to change the automatic formatting options before autoformatting begins, use the AutoFormat command (Format menu) instead of clicking .
Method:- format – auto format – ok
Style (Format menu)
Defines or applies to the selection a combination of formats, called a style.
Method:- select matter – format – style – select style – ok
TOOL MENU
Spelling and Grammar (Tools menu)
Checks the active document for possible spelling, grammar, and writing style errors, and displays suggestions for correcting them. To set spelling and grammar checking options, click Options on the Tools menu, and then click the Spelling and Grammar tab.
Method:- Tool menu – spelling and grammer – check spelling – ok
Set Language (Tools menu)
Designates the language of selected text in a file that contains more than one language. The spelling checker automatically uses the dictionary for the designated language.
Method:- tool – language – set language – select language – ok
Language Thesaurus (Tools menu)
Replaces a word or phrase in the document with a synonym, antonym, or related word.
Method:- select word – tool – language – Thesaurus
Word Count (Tools menu)
Counts the number of pages, words, characters, paragraphs, and lines in the active document. Punctuation marks and special symbols are also included in the word count.
Method:- Tool menu – word count
AutoCorrect (Tools menu)
Sets the options used to correct text automatically as you type, or to store and reuse text and other items you use frequently.
Method:- Tool – Auto correct – type word in replace box like ‘A’ and type Atul in Replace box – add – close
Protect Document, Unprotect Document (Tools menu)
Prevents changes to all or part of an online form or document except as specified. You can also assign a password so that other users can annotate a document, mark revisions, or fill in parts of an online form. When a document is protected, this command changes to Unprotect Document.
Method:- Tool – protect document – form – give password – ok – again type same password – ok
For unprotect:- tool unprotect document – give password – ok
Mail Merge (Tool Menu)
Merge letters and addresses.
Method:- type letter – tool – mail merge – create – form letter – active window – get data – create data source – delete extra field – ok – give name – save – edit data source – type address – add new – after type addresses – ok – get curser at the top of the page – click insert merge field – click field name – same like this all fields do insert in the document – merge to new document.
Envelopes and Labels (Tools menu)
Creates an envelope or a single mailing label, or inserts the same name and address on an entire sheet of mailing labels.
Method:- tool menu – envelopes and label – type address - print
Letter Wizard (Tools menu)
Runs the Letter Wizard, which helps you quickly create letters.
Method:- tool menu – letter wizard – type information – ok – type letter
Customize (Tool menu)
Customizes toolbar buttons, menu commands, and shortcut key assignments.
Method:- tool – customize – toolbar – new – give name – ok – commands – drag button by mouse on toolbar.
Options (Tools menu)
Modifies settings for Microsoft Office programs such as screen appearance, printing, editing, spelling, and other options.
Method:- tool menu – option – set option
TABLE MENU
Insert Table (Table menu)
Inserts a table in the document with the number of columns and rows you specify.
Method:- table – insert – table – type No. in row and column box – ok
Insert Columns to the Left
Inserts a column into the table to the left of the insertion point. If more than one column is selected, the same number of columns are inserted into the table to the left of the selection.
Method:- Table – insert – insert column to the left
Insert Columns to the Right
Inserts a column into the table to the right of the insertion point. If more than one column is selected, the same number of columns are inserted into the table to the right of the selection.
Method:- Table – insert – insert column to the right
Insert Rows Above
Inserts a row into the table above the insertion point. If more than one row is selected, the same number of rows are inserted into the table above the selection.
Method:- table menu – insert – insert row above
Insert Rows Below
Inserts a row into the table below the insertion point. If more than one row is selected, the same number of rows are inserted into the table below the selection.
Method:- table menu – insert – insert row below
Cells
Inserts cells starting at the insertion point. You can choose to shift other cells in the table to the right or down. You can also insert an entire row or column.
Method:- table menu – insert menu – cell – ok
Delete Table
Deletes the selected table from the document.
Method:- table – delete – table
Delete Columns
Deletes from the table the selected columns or the column that contains the insertion point.
Method:- table – delete – column
Delete Rows
Deletes from the table the selected rows or the row that contains the insertion point.
Method:- table – delete – row
Delete Cells
Deletes from the table the selected cells or the cell that contains the insertion point.
Method:- table – delete – cell
Merge Cells
Merge selected cells into one cell
Method:- do select cells - Table – merge cells
Split Cells / Unmerge Cells
In Microsoft Word and Microsoft PowerPoint, splits the selected cells into the number of rows and columns you enter.
Method:- bring point on cell – table – split cells – type no of column – ok
Split Table (Table menu)
Divides a table into two separate tables and inserts a paragraph mark above the row that contains the insertion point.
Method:- Bring pointer on that row from where you want to split the table – table – split table
AutoFormat (Table menu)
In Microsoft Word, automatically applies formats, including predefined borders and shading, to a table. Automatically resizes a table to fit the contents of the table cells.
Method:- pointer on table – table – auto format – select format – ok
AutoFit to Contents
Automatically adjusts the width of columns in the table, based on the amount of text you type.
Method:- pointer on table – table – auto fit – auto fit to contents
AutoFit to Window
Automatically resizes the table so that it fits within the window of a Web browser. When the window size of the Web browser changes, the table size automatically adjusts to fit within the window.
Method:- pointer on table – table – auto fit – auto fit to window
Fixed Column Width
Makes each column a fixed width in the table, using the current widths of the columns.
Method:- pointer ont able – table – auto fit – fixed column width
Distribute Rows Evenly
Changes the selected rows or cells to equal row height.
Method:- select rows- table – auto fit – distribute row evently
Distribute Columns Evenly
Changes the selected columns or cells to equal column width.
Method:- select columns – table - auto fit – distribute columns evently.
Heading Rows Repeat (Table menu)
Designates the selected rows to be a table heading that is repeated on subsequent pages if the table spans more than one page. This command is available only if the selected rows include the top row of a table.
Method:- make table 3 or 4 pages – bring pointer in first row – table – heading row repeat – type heading
Convert Table to Text
Converts a selected table or selected table rows to text, separating the contents of the cells in each row with the separator character you specify.
Method:- pointer on table – table – convert – table to text
Sort
Arranges the information in selected rows or lists alphabetically, numerically, or by date.
Method:- make list - pointer on list – table – sort – ascending or descending – ok
Formula (Table menu)
Performs mathematical calculations on numbers.
Method:- bring pointer below numbers cell – table – formula – ok
Gridlines
In a table, the Gridlines command (Table menu) displays or hides dotted gridlines to help you see which cell you're working in. Table gridlines don't print; if you want to add printable gridlines to your table, use the Borders and Shading command (Format menu).
Method:- select table – click on outside border button (which is format bar) – select no border
To hide gridlines – table – hide gridlines. To show gridlines – table – show gridlines.
WINDOW MENU
New Window (Window menu)
Opens a new window with the same contents as the active window so you can view different parts of a file at the same time.
Method:- Window – New window
Arrange (Window menu)
Displays all open files in separate windows on the screen. The Arrange command makes it easier to drag between files.
Method:- window menu – arrange all
Split (Window menu)
Splits the active window into panes, or removes the split from the active window.
Method:- window menu – split. To unsplit window – window – remove split
--------------------------END----------------------------
Wednesday, December 9, 2009
DRIVES
What are drives?
Drives are used to store data. Almost all computers come with at least two drives: a hard drive (which is used to store large volumes of data) and a CD drive(which stores smaller volumes of data that can be easily transported from one computer to another). The hard drive is typically designated the C:\ drive and the CD drive is typically designated the D:\ drive. If you have an additional floppy drive, it is typically designated the A:\ drive. If your hard drive is partitioned or if you have additional drives, the letters E:\, F:\, G:\ and so on are assigned.
Drives are used to store data. Almost all computers come with at least two drives: a hard drive (which is used to store large volumes of data) and a CD drive(which stores smaller volumes of data that can be easily transported from one computer to another). The hard drive is typically designated the C:\ drive and the CD drive is typically designated the D:\ drive. If you have an additional floppy drive, it is typically designated the A:\ drive. If your hard drive is partitioned or if you have additional drives, the letters E:\, F:\, G:\ and so on are assigned.
WHAT IS A FONT
WHAT IS A FONT?
A font is a set of characters represented in a single typeface. Each character within a font is created by using the same basic style. Means in which style we type matter that is called font.
A font is a set of characters represented in a single typeface. Each character within a font is created by using the same basic style. Means in which style we type matter that is called font.
Can you explain font size?
Fonts are measured in points. There are 72 points to an inch. The number of points assigned to a font is based on the distance from the top to the bottom of its longest character.
How do I install a new font?
To install a new font:
Click the Start button.
Highlight Settings.
Click Control Panel.
Click Fonts. The Fonts window will open.
Click File, which is located on the menu bar.
Click Install New Font.
Specify the drive and folder where the font you want to install is currently located.
Select the font you want to install from the fonts listed in the List of Fonts box.
Select Copy Fonts to Fonts Folder (this will put a copy of the font you are installing in the Fonts folder).
Click OK.
Monday, December 7, 2009
SAVE DATA INTO PEN DRIVE OR OTHER DEVICE
SAVE DATA INTO PENDRIVE OR OTHER DEVICES


Put Pendrive on your computer USB Port. After one minutes
Double Click on My Computer Icon - Click on Removable Drive - your pendrive will be open.
Go to 'My Document' Folder - Now click on file - Click on File Menu - Click Send to - Click Removable Disk. Your file will be copy into the Pendrive.
WINDOW EXPLORER
What is Windows Explorer?
Windows Explorer is a place where you can view the drives on your computer and manipulate the folders and files. Using Windows Explorer, you can cut, copy, paste, rename, and delete folders and files.
How do I Open Windows Explorer?
To open Windows Explorer:
Click the Start button, located in the lower left corner of your screen.
Highlight programs.
Highlight Accessories.
Click Windows Explorer.
Alternatively, you can open Windows Explorer by holding down the Windows key and typing e (Windows-e).
It is called Window Explorer:-

The Yellow Icon is Folder and other are files and icons.
To open a file or folder
Open Window Explorer and
Double-click the file or folder you want to open, from window explorer we can open file and folder directly whether it is created by any software program like Ms-word, Excel etc..
Windows XP separates the window into two panes. If you click an object in the left pane, the contents of the object display in the right pane. Click Desktop and the contents of the Desktop folder display on the right. Click My Computer and your computer resources display on the right. To see the contents of a drive, click the drive. To see the contents of a folder, click the icon for the folder in the left pane.
A font is a set of characters represented in a single typeface. Each character within a font is created by using the same basic style.
What are drives?
Drives are used to store data. Almost all computers come with at least two drives: a hard drive (which is used to store large volumes of data) and a CD drive
(which stores smaller volumes of data that can be easily transported from one computer to another). The hard drive is typically designated the C:\ drive and the CD drive is typically designated the D:\ drive. If you have an additional floppy drive, it is typically designated the A:\ drive. If your hard drive is partitioned or if you have additional drives, the letters E:\, F:\, G:\ and so on are assigned.
Windows Explorer is a place where you can view the drives on your computer and manipulate the folders and files. Using Windows Explorer, you can cut, copy, paste, rename, and delete folders and files.
How do I Open Windows Explorer?
To open Windows Explorer:
Click the Start button, located in the lower left corner of your screen.
Highlight programs.
Highlight Accessories.
Click Windows Explorer.
Alternatively, you can open Windows Explorer by holding down the Windows key and typing e (Windows-e).
It is called Window Explorer:-

The Yellow Icon is Folder and other are files and icons.
To open a file or folder
Open Window Explorer and
Double-click the file or folder you want to open, from window explorer we can open file and folder directly whether it is created by any software program like Ms-word, Excel etc..
Windows XP separates the window into two panes. If you click an object in the left pane, the contents of the object display in the right pane. Click Desktop and the contents of the Desktop folder display on the right. Click My Computer and your computer resources display on the right. To see the contents of a drive, click the drive. To see the contents of a folder, click the icon for the folder in the left pane.
My Document folder
The My Documents folder is your own personal folder in which you can store your documents, graphics, and other personal files. When there is more that one person using the computer, Windows creates a My Documents folder for each user on the computer. When you save your file it is authomatically saved in my document folder. When we open window explorer my document folder is automatically open by default. We can open my document folder from the desktop. My document folder icon shows on the desktop.
WHAT IS FOLDER?
In graphical user interfaces such as Windows. Folder is an object that can contain multiple documents. Folders are used to organize information. In the DOS and UNIX worlds, folders are called directories. Folder is like bag. for example like we put things in a bag. same like this we puts files into the folder. Folders are used to organize the data stored on your drives. The files that make up a program are stored together in their own set of folders. You will want to organize the files you create in folders. You will want to store files of a like kind in a single folder.
Create a New Folder
Method:- 1
Open Window Explorer
Click on File menu - click New - Folder - Type Name and press enter button from the keyboard.
Method:- 2 Right click on blank portion in Window Explorer - Click New - Folder - Type Name and press enter button.
TO COPY A FILE OR FOLDER.
- Open Window Explorer
- Select file (Click any file or name for select) - Click on Edit Menu - Click 'Copy' Option.
- After that Open Folder Or Drive.
- Click on Edit Menu - click Paste option.
- You file will be copy.
TO MOVE A FILE OR FOLDER.
Open Window Explorer
Select file (Click any file or name for select) - Click on Edit Menu - Click 'Cut' Option.
After that Open Folder Or Drive.
Click on Edit Menu - click Paste option.
You file will be copy.
TO CHANGE THE NAME OF FILE AND FOLDER
Open Window Explorer
Method:- Select File - Click on File Menu - Click Rename option - After that type Name and press enter button.
TO DELETE A FILE OR FOLDER
Method:- Select file or folder - Click on File Menu - Click Delete Option - Click Yes button. Your file will be delete and move into the recycle bin.
TO RESTORE DELETED FILE OR FOLDER
If you want to come back your deleted file means you want to restore your deleted files.
Click on recycle bin in the list of left side window into window explorer or go to desktop and double click on recycle bin - Select file - Click on file menu - Click Restore button. Your file will be restore on that locaiton from where you had delete your file.
TO CREATE SHORTCUT OF FILE AND FOLDER ON DESKTOP
If you want to quick access your file or folder then you can create shortcut of your file and folder.
Method:- Open Window Explorer - Select File - Click file menu - Click on Send to - click Desktop Create Shortcut. Your file's shortcut icon will be create on desktop.
TO SEARCH FILE OR FOLDER
Method:- Click on Start Button - Click on search - click for Files or Folder - Click on All files or folders button - Type File Name - click on Search button. Your file will be search and come on screen. If your file has been deleted then it won't come.
TO CHANGE WALLPAPER
What is wallpaper?
Wallpaper is the background that displays on your desktop.
Right click on Desktop - Click on Properties - Click desktop or background button - Select background from list - click on ok button. Background will be change.
TO CHANGE COMPUTER SCREEN SAVER
A screensaver is a type of computer program initially designed to prevent phosphor burn-in on CRT and plasma computer monitors by blanking the screen or filling it with moving images or patterns when the computer is not in use.
Right click on Desktop - Click on Properties - Click Screensaver option - Select Screen Save from list - click on ok button. screensaver will be change.
What is a font?A font is a set of characters represented in a single typeface. Each character within a font is created by using the same basic style.
What are drives?
Drives are used to store data. Almost all computers come with at least two drives: a hard drive (which is used to store large volumes of data) and a CD drive
(which stores smaller volumes of data that can be easily transported from one computer to another). The hard drive is typically designated the C:\ drive and the CD drive is typically designated the D:\ drive. If you have an additional floppy drive, it is typically designated the A:\ drive. If your hard drive is partitioned or if you have additional drives, the letters E:\, F:\, G:\ and so on are assigned.
PROGRAM, FOLDER AND ICONS
PROGRAMS, FOLDER AND ICONS
Program, folder, and document icons do not have an arrow in the lower left corner. They represent the actual object and provide direct access to the object.
Program, folder, and document icons do not have an arrow in the lower left corner. They represent the actual object and provide direct access to the object.
SHORTCUT ICON
SHORTCUT ICON
Icons with an arrow in the lower left corner are shortcut icons. Click the icon for quick access to the object they represent (program, document, printer, and so on).
Icons with an arrow in the lower left corner are shortcut icons. Click the icon for quick access to the object they represent (program, document, printer, and so on).
RECYCLE BIN
RECYCLE BIN
When you delete an object, Windows XP sends it to the Recycle Bin. You can restore objects that are located in the Recycle Bin or you can permanently delete them.
It shows on the desktop.
When you delete an object, Windows XP sends it to the Recycle Bin. You can restore objects that are located in the Recycle Bin or you can permanently delete them.
It shows on the desktop.
INTERNET EXPLORER
INTERNET EXPLORER
The Internet Explorer icon launches the Internet Explorer browser. We can open any webiste through the explorer.
The Internet Explorer icon launches the Internet Explorer browser. We can open any webiste through the explorer.
Friday, December 4, 2009
HOW DO I SHUT THE COMPUTER
How do I shut down my computer?
To shut down your computer:

Click the Start button. The Start menu will appear.
Click Turn Off Computer. The Turn Off Computer dialog box will appear.
Click the Turn Off icon. Your computer will shut down.
To shut down your computer:

Click the Start button. The Start menu will appear.
Click Turn Off Computer. The Turn Off Computer dialog box will appear.
Click the Turn Off icon. Your computer will shut down.
NOTE:- If you not properly shut down your computer and directly switch off the button. You computer can be damage.
Tuesday, November 3, 2009
MY COMPUTER
WHAT IS MY COMPUTER
The My Computer icon provides access to the resources on your computer. You can access your drives and other peripherals by clicking on the My Computer icon. It is shown on the desktop.
The My Computer icon provides access to the resources on your computer. You can access your drives and other peripherals by clicking on the My Computer icon. It is shown on the desktop.

HOW TO CHECK COMPUTER'S DISK SPACE
MY COMPUTER
Double-click on the "My Computer" icon, located on your desktop. This will open the "My Computer" window.
Locate your hard drive. This will denoted as "Local Disk (C:)" on most computers.
Right-click on your hard drive icon and select "Properties". This will open a window that displays all the information that you need about your Hard Disk, along with a pie chart illustration.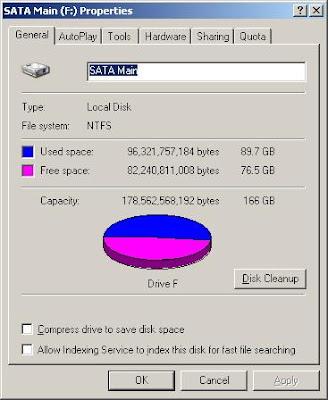
1 Gigabyte is equal to 1,024 Megabytes.
1 Megabyte is equal to 1,024 Kilobytes.
1 Kilobyte is equal to 1,024 Bytes.
1 Byte is 2 Nibbles.
1 Nibble is 4 bits.
Double-click on the "My Computer" icon, located on your desktop. This will open the "My Computer" window.
Locate your hard drive. This will denoted as "Local Disk (C:)" on most computers.
Right-click on your hard drive icon and select "Properties". This will open a window that displays all the information that you need about your Hard Disk, along with a pie chart illustration.

1 Gigabyte is equal to 1,024 Megabytes.
1 Megabyte is equal to 1,024 Kilobytes.
1 Kilobyte is equal to 1,024 Bytes.
1 Byte is 2 Nibbles.
1 Nibble is 4 bits.
Monday, October 26, 2009
TASKBAR
TASKBAR
A bar commonly located at the bottom of Microsoft Windows 95, Windows 98, Windows NT Windows 2000, Windows ME, Windows XP , and Windows 7 operating systems that displays the programs that are currently running. This bar also displays the time, Systray, and in later revisions of the Windows operating system. This is the Taskbar

What is a Desktop

What is a desktop?
When you start your computer, the first thing you see is the desktop. The desktop is your work area.
When you start your computer, the first thing you see is the desktop. The desktop is your work area.

Sunday, October 25, 2009
OUTPUT DEVICES
OUTPUT DEVICES
Any peripheral that receives and/or displays output from a computer. Below are some examples of different types of output devices commonly found on a computer.
Monitor
Printer
Projector
Sound card
Speakers
Video card
Any peripheral that receives and/or displays output from a computer. Below are some examples of different types of output devices commonly found on a computer.
Monitor
Printer
Projector
Sound card
Speakers
Video card
INPUT DEVICES
INPUT DEVICES
A hardware device that sends information into the CPU. Without any input devices a computer would simply be a display device and not allow users to interact with it, much like a TV. Below is a listing of different types of computer input devices.
Digital camera
Joystick
Keyboard
Microphone
Mouse
Scanner
Web Cam
BLUETOOTH TECHNOLOGY
BLUETOOTH
Bluetooth is a standard and a communications protocol primarily designed for low power consumption, with a short range (power-class-dependent: 1 metre, 10 metres, 100 metres) based on low-cost transceiver microchips in each device.
More prevalent applications of Bluetooth include:
Wireless control of and communication between a mobile phone and a hands-free headset. This was one of the earliest applications to become popular.
Wireless networking between PCs in a confined space and where little bandwidth is required.
Wireless communication with PC input and output devices, the most common being the mouse, keyboard and printer.
Computer Requirements:
A personal computer must have a Bluetooth adapter in order to communicate with other Bluetooth devices (such as mobile phones, mice and keyboards). While some desktop computers and most recent laptops come with a built-in Bluetooth adapter, others will require an external one in the form of a dongle.
Saturday, October 24, 2009
SCANNER

SCANNER
In computing, a scanner is a device that optically scans images, printed text, handwriting, or an object, and converts it to a digital image.
OPERATING SYSTEM
OPERATING SYSTEM
Operating system is system software. It works like interface between user and computer system. It configure to computer. It configures Harddisk, RAM, and Floppy Disk etc. It is a language-based software like C, C++, Java. It is primary software over which other application software is installed. Application software means MS-Word, Excel, PowerPoint etc. is application software. There are many operating system in the market:- Window 3.11, 3.1, 95, 98, 2000 professional, ME, XP, Vista and Window 7.
Operating system is system software. It works like interface between user and computer system. It configure to computer. It configures Harddisk, RAM, and Floppy Disk etc. It is a language-based software like C, C++, Java. It is primary software over which other application software is installed. Application software means MS-Word, Excel, PowerPoint etc. is application software. There are many operating system in the market:- Window 3.11, 3.1, 95, 98, 2000 professional, ME, XP, Vista and Window 7.
DATA
WHAT IS DATA ?
Data is a raw material. It is a collection of facts and figures. we type anything in the computer it is called data.
Data is a raw material. It is a collection of facts and figures. we type anything in the computer it is called data.
BITS
BITS
Small storage unit of measurement. Mean
8 bits makes 1 bytes
1 byte means 1 character mean 1 word of english word like 'A'
for example you type I LOVE YOU. in this line character is 7. got it.
1024 bytes makes 1 Kilobyte (KB)
1024 kilobytes makes 1 Mega byte (MB)
1024 Mega Byte makes 1 Giga Bytes. (GB)
File size comes in kb and mb
but harddisk and pen drive sizes comes in GB.
TV TUNER CARD


TV TUNER EXTERNAL CARD
TV TUNER CARD
A TV tuner card is a computer component that allows television signals to be received by a computer. Most TV tuners also function as video capture cards, allowing them to record television programs onto a hard drive. You can enjoy TV programs on your computer. There are two type of TV Tuner Card:-
1. Internal
2. External.
1. Internal TV Tuner Card:- We put this card into the CPU. We can use this card only when the PC is On. Means without On Computer we cannot see TV program on the computer..
2. External TV Tuner Card:- We can put this card outside of CPU. We can use this card also when the PC is off. Mean we can see TV Programs on the computer when the PC is off.
MOUSE

MOUSE
A hand-operated electronic device that controls the coordinates of a cursor on your computer screen as you move it around on a pad; on the bottom of the device is a ball that rolls on the surface of the pad; "a mouse takes much more room than a trackball" We give all commands to computer through mouse.
A hand-operated electronic device that controls the coordinates of a cursor on your computer screen as you move it around on a pad; on the bottom of the device is a ball that rolls on the surface of the pad; "a mouse takes much more room than a trackball" We give all commands to computer through mouse.
KEYBOARD

KEYBOARD
Computer keyboard is a peripheral modeled after the typewriter keyboard. Keyboards are designed for the input of text and characters, and also to control the operation of the computer.
Computer keyboard is a peripheral modeled after the typewriter keyboard. Keyboards are designed for the input of text and characters, and also to control the operation of the computer.
MONITOR

MONITOR
Monitor is an output device. Which work we do on computer we look that work on the monitor.
Monitor is an output device. Which work we do on computer we look that work on the monitor.
LAN CARD

LAN CARD NIC (Network Interface CARD)
It is used for Networking. Networking means connecting one computer to another computer to share the resources and databases (mainly printer and scanner). If this card is not present in the system so you cannot connect one computer with other computers.
SOUND CARD

SOUND CARD
It is used for sound. If this card is not present so you cannot hear any sound from computer means you cannot hear any song, movie voice etc.
VIDEO CARD

VIDEO CARD
It is used for monitor display. If this card is not present in your computer then your computer monitor's display won’t come.
PEN DRIVE / USB DRIVE / FLASH DRIVE

PEN DRIVE/USB DRIVE/FLASH DRIVE
Pen Drive is a small keyring-sized device that can be used to easily transfer files between USB-compatible systems.
DVD ROM DRIVE

DVD ROM DRIVE
You can play dvd only in dvd rom drive. In this drive you can play cd and dvd.
CD-ROM DRIVE:- you can play only cd in this drive.
CD WRITER DRIVE:- drive you can play and write your cd in this cd writer drive.
COMBO DRIVE:- You can play & write your CD and Play DVD in this Drive.
DVD WRITER ROM DRIVE:- You can Play & write your CD and DVD in this drive.

Friday, October 23, 2009
CD ROM DRIVE

CD-ROM DRIVE (D: Drive )
A CD-ROM (Compact Disk Read Only Memory) is a drive, which reads aluminum-coated round plastic discs. You can play audio and video cd on this CD-ROM. You can not write your cd from CD-Rom Drive. If you want to copy your data mean write your data on CD then you should have CD-Writer Rom Drive. You can write your CD only through CD-Writer. In Short you want to play and write your CD then you should have CD-Writer Rom Drive.
A CD-ROM (Compact Disk Read Only Memory) is a drive, which reads aluminum-coated round plastic discs. You can play audio and video cd on this CD-ROM. You can not write your cd from CD-Rom Drive. If you want to copy your data mean write your data on CD then you should have CD-Writer Rom Drive. You can write your CD only through CD-Writer. In Short you want to play and write your CD then you should have CD-Writer Rom Drive.
CD: COMPACT DISK

CD (COMPACT DISK)
CD-ROM (an abbreviation of "Compact Disc Read-Only Memory") is a compact disc that contains data accessible by a computer. While the compact disc format was originally designed for music storage and playback, the format was later adapted to hold any form of binary data. CD-ROMs are popularly used to distribute computer software, including games and multimedia applications, though any data can be stored (up to the capacity limit of a disc). Some CDs hold both computer data and audio with the latter capable of being played on a CD player, whilst data (such as software or digital video) is only usable on a computer. These are called Enhanced CDs. CDs’ comes in different. CD comes is many storage capacity. For e.g. 700 MB, 800 MB.
There are two types of CD in the market:-
1. Writable CD- You can write (store) your data only once time on this CD.
2. Re-writable CD- You can write (store) your data many times on this CD.
FLOPPY DISK DRIVE (FDD)

FLOPPY DISK (FDD) 3 ½” FLOPPY DISK (A: Drive )
A soft magnetic disk. Disk drives for floppy disks are called floppy drives. Floppy disks are slower to access than hard disks and have less storage capacity. It storage capacity of 1.44 MB but In practical way its size is 1.38 MB
A soft magnetic disk. Disk drives for floppy disks are called floppy drives. Floppy disks are slower to access than hard disks and have less storage capacity. It storage capacity of 1.44 MB but In practical way its size is 1.38 MB
HARD DISK DRIVE (HDD)

HARD DISK (HDD) C: Drive
A magnetic disk on which you can store computer data. Hard disks hold more data and are faster than floppy disks. A hard disk, for example, can store anywhere from 10 to more than 100 gigabytes, whereas most floppies have a maximum storage capacity of 1.4 megabytes.
A magnetic disk on which you can store computer data. Hard disks hold more data and are faster than floppy disks. A hard disk, for example, can store anywhere from 10 to more than 100 gigabytes, whereas most floppies have a maximum storage capacity of 1.4 megabytes.
MOTHERBOARD

MOTHERBOARD
Motherboard is a big circuit board into the computer. It is a very important part of computer. Other computer parts / components attaches with it.
Motherboard is a big circuit board into the computer. It is a very important part of computer. Other computer parts / components attaches with it.
C.P.U. OR SYSTEM UNIT


SYSTEM UNIT OR C.P.U.
C.P.U.
(Central Processing Unit)
C.P.U. stands for center-processing unit is the engine that drives the entire operation. It performs the math calculation and processing million instruction of per second. There are three types of C.P.U. units: -
1. A.L.U. (ARITHMETICAL LOGICAL UNIT): - It does math calculation for entire P.C.
2. C.U. (Control Unit): - It performs on FIFO Method. It executes the commands in que.
3. S.U. / M.U.:- (Secondary Unit/Memory Unit):- There are two type of Memory:-
1 Primary Memory 2. Secondary Memory
1. Primary Memory:- It is self-memory of Computer if this memory is not present with the system so the system cannot do anything. For e.g. ROM & RAM.
1. ROM:- stands for Read Only Memory. You cannot type any fresh information on it. It holds the data on Permanently basis. If the power supply is switched off, your data won’t be lost in Rom case.
2. RAM: - stands for Random Access Memory. It holds the data on temporary basis. If the power supply is switched off, your data will be lost in RAM Case.
2. Secondary Memory: - It is a storage capacity of computer. If this memory is not present with the system then you cannot save any data on the system. For e.g. hard disk, Floppy disk, CD-Rom.
WHAT IS COMPUTER

What is computer?
Computer is an electronics device, which uses for data storage with fastest processing. It is emotionless machine. It is common operating machine particularly uses for education, training and research.
Computer is an electronics device, which uses for data storage with fastest processing. It is emotionless machine. It is common operating machine particularly uses for education, training and research.
Subscribe to:
Posts (Atom)
